
Introduction
What is Maximizer OAuth?
Maximizer OAuth is a web application that implements the OAuth 2.0 protocol, enabling secure and delegated access to Maximizer’s data and services. It allows client applications to request authorization without requiring users to share their credentials directly. Instead, it issues access tokens through an authorization process, ensuring secure communication and control over data access. This approach enhances security, scalability, and user convenience by supporting industry-standard authentication mechanisms.
Note: We have examples of OAuth in the Postman collection.
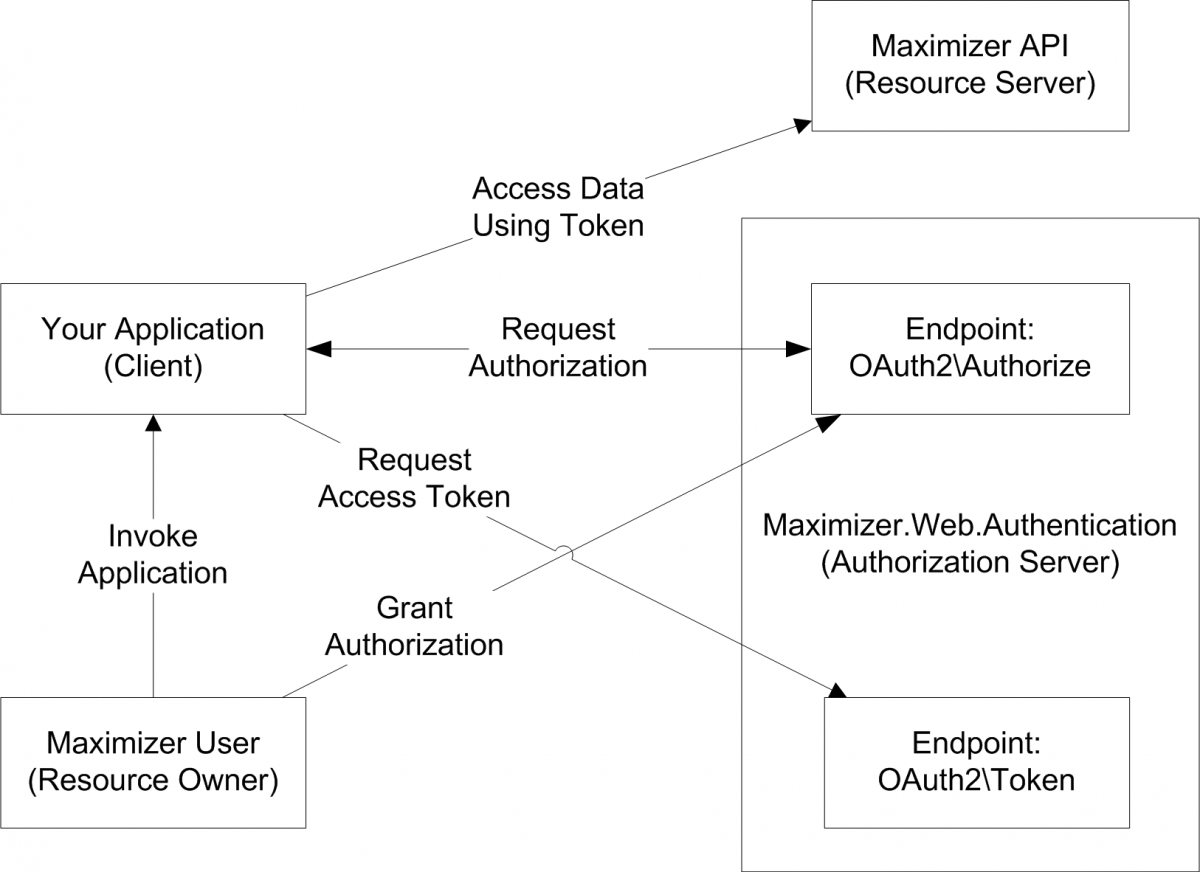
What is OAuth 2.0?
OAuth 2.0 is an industry-standard authorization protocol that enables third-party clients or applications to securely request and gain delegated access to private resources on behalf of a user, without sharing user credentials. It uses access tokens to grant limited permissions, ensuring secure interactions with systems such as Maximizer CRM and other web-based platforms.
For more information about OAuth 2.0, refer to the OAuth community site.
Why Use OAuth 2.0?
Traditionally, standalone applications accessing Maximizer data required storing user credentials, introducing security risks. Maximizer OAuth addresses this by enabling users to grant consent for applications to access resources securely, without exposing usernames and passwords. This token-based approach enhances security, reduces risks associated with credential storage and password changes, and mitigates vulnerabilities such as phishing and replay attacks.
Getting Started
Setting Up OAuth for Maximizer Cloud
Obtaining client_id and client_secret
To work with Maximizer OAuth, you must have:
- OAuth
client_idandclient_secretto use OAuth.
To obtain these credentials, please send a request to [email protected] with the following information:
- Full Name
- E-mail Address
- Organization Name
- Redirect URL
You will receive the client_id and client_secret from the Maximizer team.
Determining the OAuth2 endpoint URLs
For Maximizer Cloud, endpoints include the account {company_alias} and region-specific subdomains. The {company_alias} is a part of the URL used to log in to Maximizer.
For example, if the URL for the client login is: https://caw.maximizercrmlive.com/whitecaps, the part "whitecaps" is the {company_alias}.
- OAuth2/Authorize:
https://{region}.maximizercrmlive.com/OAuth2/{company_alias}/Authorize
- OAuth2/Token:
https://{region}.maximizercrmlive.com/OAuth2/{company_alias}/Token
{company_alias}: Alias of the Maximizer Cloud account.{region}: Region-specific subdomain (e.g.,caw,ukw).
Setting Up OAuth for Maximizer On-Premise
Obtaining client_id and client_secret
-
Access Maximizer Administrator:
- Log in with an account that has the Administrator role.
-
Navigate to OAuth Settings:
- In the left pane, under Preferences, select System Options.
- Click on the OAuth 2.0 Settings tab.
-
Add a New OAuth Client:
- Click Add.
- Enter the following details:
- Name: The name of your OAuth 2.0 client application.
- Redirect URI: The authorized URIs where users will be redirected after authorization. Supports multiple URIs separated by comma. During authorization, a single URI must be provided and it should match one of the URIs registered in this field.
-
Save the Client Profile:
- Click Save to generate the
client_idandclient_secret.
- Click Save to generate the
Note: If you're developing for third-party clients or customers, provide them with instructions to configure the OAuth Client Profile for their applications.
Determining the OAuth2 endpoint URLs
Maximizer OAuth is installed alongside Maximizer.Web.Access in an IIS application named "MaximizerWebAuthentication." The default endpoint URLs are:
- OAuth2/Authorize:
https://{server}/MaximizerWebAuthentication/OAuth2/Authorize - OAuth2/Token:
https://{server}/MaximizerWebAuthentication/OAuth2/Token {server}: Domain name of your Web Access server.
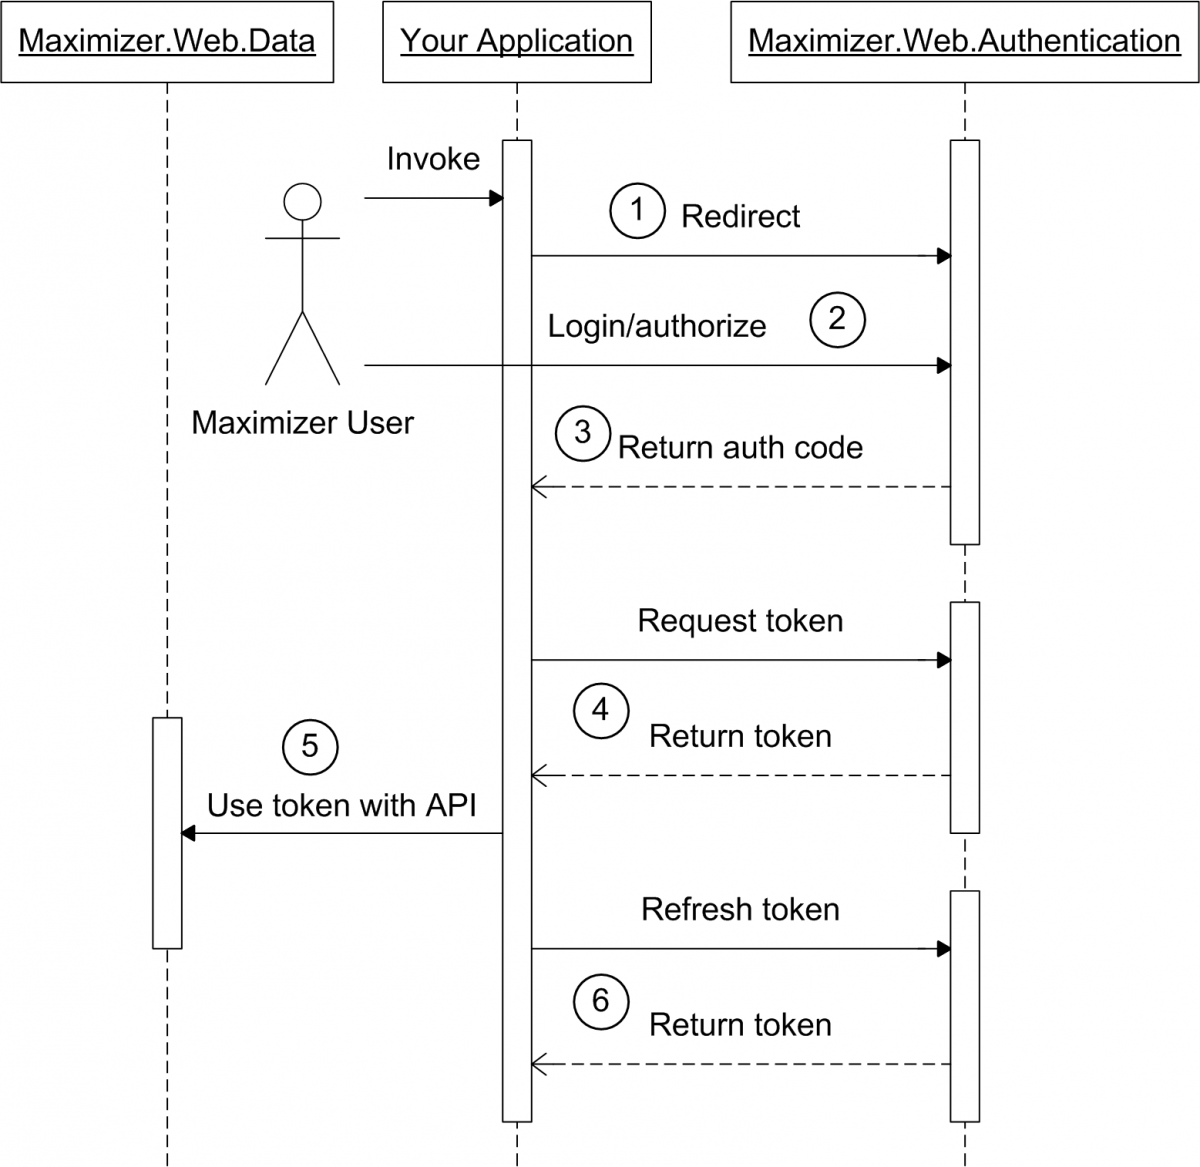
OAuth 2.0 Authorization Code Grant Workflow
Maximizer OAuth supports the Authorization Code Grant workflow, allowing web server applications to obtain API access tokens on behalf of Maximizer users.
Overview
The Authorization Code Grant workflow involves the following steps:
- Request Authorization Code
- User Approval
- Receive Authorization Code
- Request Access Token
- Use Token to Access Maximizer APIs
- Refresh Your Access Token
Step 1: Request Authorization Code
To obtain an access token, your application must first request an authorization code on behalf of the user by redirecting them to the OAuth2/Authorize endpoint.
Required Parameters
| Parameter | Description |
|---|---|
response_type | Must always be "code". |
client_id | The 20-character client ID issued for your application by the OAuth Setup in Maximizer. |
redirect_uri | The registered Redirect URI for your application in Maximizer, starting with "https". Must match exactly and cannot include additional URL parameters. Use the state parameter for extra data. |
Optional Parameters
| Parameter | Description |
|---|---|
scope | A space-delimited list of access scopes requested. Defaults to "data" if not provided.Available scopes:
|
state | An alphanumeric value to maintain state between the request and callback. Recommended to prevent CSRF attacks by verifying this value upon return. If omitted, a warning is displayed during user login. |
Authorize Endpoint URLs
Maximizer Cloud
https://{region}.maximizercrmlive.com/OAuth2/{company_alias}/Authorize?response_type=code&client_id={client_id}&redirect_uri={redirect_uri}&state={csrf_token}{company_alias}: Alias of the Maximizer Cloud account.{client_id}: Your application's client ID.{redirect_uri}: Your application's registered redirect URI.
Maximizer On-Premise
https://{server}/MaximizerWebAuthentication/OAuth2/Authorize?response_type=code&client_id={client_id}&redirect_uri={redirect_uri}&state={csrf_token}{server}: Maximizer Web Access server address.{client_id}: Your application's client ID.{redirect_uri}: Your application's registered redirect URI.
Step 2: User Approval
Upon redirection to the OAuth2/Authorize endpoint, the user is prompted to log in to Maximizer and grant your application access to their Maximizer resources.
Step 3: Receive Authorization Code
After the user grants permission, Maximizer OAuth redirects the user back to your application's redirect_uri with additional parameters.
Success Redirect URL
{redirect_uri}?code={authorization_code}&state={state_parameter}&login_hint=d%20{database_name}%20u%20USER_ID{authorization_code}: JWT token for requesting an access token.{state_parameter}: Value supplied in the original request for CSRF protection.USER_ID: ID of the user who granted access.{database_name}: Name of the database authorized (usually represented as a unique identifier).
Error Redirect URL
{redirect_uri}?error={error}&error_description={description}&state={state_parameter}{error}: Error code.{description}: Detailed error description.{state_parameter}: Value supplied in the original request for CSRF protection.
Step 4: Request Access Token
With the authorization code, your application can request an access token.
Request
Make an HTTP POST request to the OAuth2/Token endpoint with the following parameters:
| Parameter | Description |
|---|---|
grant_type | Must be "authorization_code". |
client_id | Your application's 20-character client ID issued by Maximizer. |
client_secret | Your application's 64-character client secret issued by Maximizer. |
redirect_uri | The same Redirect URI registered in Maximizer. |
code | The authorization code received from the OAuth2/Authorize endpoint. This is a JWT token and can vary in length. |
Example Request
POST /OAuth2/Token HTTP/1.1
Host: {server}
Content-Type: application/x-www-form-urlencoded

grant_type=authorization_code&client_id=a82cz44dydhu00k2wpfb&client_secret=pv28mq41bj1qvwouti64o9ourmlju42iq7n94hjonmf7ylge89k1znm7u16s6yx7&redirect_uri=https%3A%2F%2Fwww.example.com%2Fmyapp%2Foauth&code=n6cnsjcjzoo96e9y2e8s
Response
A successful token request returns a JSON object:
| Parameter | Description |
|---|---|
access_token | JWT token for accessing Maximizer APIs. JWTs can vary in length depending on the data stored within them. Note: Do not store access_token in persistent storage with defined length. |
token_type | Type of token; always "Bearer". |
expires_in | Time in seconds before the token expires (e.g., 600). |
refresh_token | Token used to obtain a new access token. |
Example Response
{
  "access_token": "i6uzve7e1mjydzkxy32s",
  "token_type": "Bearer",
  "expires_in": 600,
  "refresh_token": "rzu6upulv3kkqu4bd4cs"
}
If an error occurs, the response includes error details:
| Property | Description |
|---|---|
error | OAuth2 error code. |
error_description | Detailed error description. |
state | State parameter from the original request. |
Expiration
Access tokens are valid for 10 minutes (600 seconds). Each time the token is used, its validity is automatically extended for another 10 minutes, up to a maximum lifespan of 24 hours. After 24 hours, a new access token must be obtained through reauthorization or a refresh token.
Step 5: Use Token to Access Maximizer APIs
With the access_token, your application can make authorized requests to Maximizer APIs such as Octopus API, Ferret API, or Webhooks API. Refer to the relevant API documentation for usage details.
Tokens are sent in the Authorization header with the prefix Bearer, for example:
Authorization: Bearer <access_token>Note: The access_token is a JWT and can vary in length. It is not recommended to store access_token in any persistent storage that assumes a defined length.
Step 6: Refresh Your Access Token
Access tokens expire after a set period. Use the refresh_token to obtain a new access token without requiring user re-authentication.
Request
Make an HTTP POST request to the OAuth2/Token endpoint with the following parameters:
| Parameter | Description |
|---|---|
grant_type | Must be "refresh_token". |
client_id | Your application's 20-character client ID issued by Maximizer. |
client_secret | Your application's 64-character client secret issued by Maximizer. |
redirect_uri | The same Redirect URI registered in Maximizer. |
refresh_token | The refresh token received from the previous token request. |
Example Request
POST /OAuth2/Token HTTP/1.1
Host: {server}
Content-Type: application/x-www-form-urlencoded

grant_type=refresh_token&client_id=a82cz44dydhu00k2wpfb&client_secret=pv28mq41bj1qvwouti64o9ourmlju42iq7n94hjonmf7ylge89k1znm7u16s6yx7&redirect_uri=https%3A%2F%2Fwww.example.com%2Fmyapp%2Foauth&refresh_token=rzu6upulv3kkqu4bd4cs
Response
A successful refresh request returns a JSON object:
| Parameter | Description |
|---|---|
access_token | New JWT token for accessing Maximizer APIs. JWTs can vary in length depending on the data stored within them. Note: Do not store access_token in persistent storage with defined length. |
token_type | Type of token; always "Bearer". |
expires_in | Time in seconds before the token expires (e.g., 600). |
refresh_token | New refresh token for future refresh requests. |
Example Response
{
  "access_token": "7vp3uitq6e7lh4p15xbs",
  "token_type": "Bearer",
  "expires_in": 600,
  "refresh_token": "iztkhdl0fxoo9xffci3s"
}
If an error occurs, the response includes error details:
| Property | Description |
|---|---|
error | OAuth2 error code. |
error_description | Detailed error description. |
state | State parameter from the original request. |
Expiration
Refresh tokens are valid for up to 180 days (6 months) and can be used only once. When a refresh token is used, a new pair of access + refresh tokens are issued, rendering the old refresh token invalid.
Using an OAuth2 Library
To ensure security and reliability, it's strongly recommended to use established open-source OAuth2 libraries available for various platforms and languages. Implementing OAuth2 correctly is crucial to prevent security vulnerabilities.
For a list of available OAuth2 libraries, visit the OAuth2 homepage.
For any technical questions or discussions - please reach us via Forums